Pages

GLITTER VALENTINE'S CARD

Friday, February 14, 2014

Between travelling and having no time for inspiration to strike I opted to try a new technique.
Mostly I like to color with my copics but I love to watch Jennifer McGuire's videos and am always amazed at the different techniques she uses.  I have a love hate relationship with glitter but when she demonstrated her stencil and glitter technique I was hooked.  I had one stencil that more or less conformed to Valentine's usage and also as a background.  I followed ALL of her directions and was so happy with the way the background turned out.  Die cut with Die-Namics Lots of Love and layered onto gold card stock and added the bits back in.  And she is right, the glitter stays on the card!


glitter background, Valentine's card, stencil
hard to photograph with my phone and get all the glorious glitter


Share to Facebook Email This Share to Twitter Pin This

PROJECT LIFE AHA MOMENT

Tuesday, January 21, 2014

Hi everyone,

I know I haven't posted since October but I really, really meant to.  Here were some of the things I planned.  Desk mess due to holiday cards, gifts etc.(explosion of product always fun to look at).  All the holiday cards, tags etc. that got created (hopefully, soon to follow).  New Years resolutions and plans and other fun things that I was sure you really wanted and needed to read.  You get the idea.  Well, that didn't happen but this AHA moment did and I wanted to share so that if any of you out there who have been hesitant to try Project Life may feel better about attempting it.  I have long admired all the Project Life projects shared by Ali Edwards, Nichol Magouirk and many, many others.  But their beautifully constructed albums were very intimidating for me.  I wanted to SIMPLIFY my scrapbooking, not have to double and triple mat photos, embellish everything and take 9 months to finish one travel album. I don't do any digital scrapping (other than to occasionally add text to photos) and it just wasn't an option that appealed to me.  I had purchased an album and some of the Becky Higgins kits and got a subscription to Studio Calico PL kits.  That was at least a year ago and yet, NOTHING done.  But (ta da) I watched the BECKY HIGGINS creativeLIVE workshop and it was truly eye-opening.  She showed examples of her own work and what a surprise it was to me that it was mostly unembellished.  This was truly liberating and the whole workshop was so well presented and organized that I was inspired to give it a go.
I took my photos of our trip to Ireland from Oct 2011 (OMG), organized them as best I could remember, stuck them in, put in the journaling card and in the space of TWO HOURS I was done. I really can't believe it was that easy and I can now sit and journal while watching TV and if I want to I can go back and embellish.  So, lesson learned here, GIVE IT A TRY, start simply and you can always get more detailed but it is a wonderful system with lots of options and choices.
And those core kits are really high value with just tons of cards in them.  

One note about my scrapbooking, it is all about travel.  My kids are grown so I don't scrap them and honestly at my age, daily life experiences are not that exciting.  What I'd like to do for my kids is to go back and take all their photos that I rescued from the old magnetic albums and make an album for each of them in the project life format.  That would be fun!
Share to Facebook Email This Share to Twitter Pin This

TWO THANKSGIVING CARDS

Sunday, October 27, 2013

What a crazy couple of weeks.On top of needing  two birthday cards and I got a card commission for two baby's first Thanksgiving and Hanukkah cards.  I knew I wanted to make two similar cards, not identical but easy to replicate and the Hanukkah cards I wanted to be identical. Since I love using Distress inks I started with a blended background, slightly different for each card.  I then stamped HA tiny stars on both, one got silver embossing and the other holographic.  I used Lawn Fawn and Simon Says for the stamps, Papertrey Ink for the words and Lawn Fawn and Papertrey Ink for the leaves


lawn fawn, papertrey ink, thanksgiving, Distress ink pads


Here is the Hanukkah card (I lifted the center medallion idea from Nichole Heady) using Papertrey Ink's Mazel Tov. I originally wanted to add an embossed border around the edges but decided on Hero Arts Paint Spots instead and Filigree silver embossing powder.The star was cut  (with offset) on my Cameo. Easy to make assembly line and I will use it as my Hanukkah card for this year.  There is a stamped and silver embossed sentiment inside.  As you can see with a 6 pointed star, it stands at a tilt. Paper is MFT Nightshft blue and I am still struggling with my white balance on my pics.

mazel tov, papertrey ink, hanukkah

mazel tov, papertrey ink, hanukkah


Share to Facebook Email This Share to Twitter Pin This

SCRAP PAPER STORAGE BOX FINISHED

Tuesday, October 1, 2013


EASY FIX.  COVER IN PATTERNED DUCT TAPE (THIS ONE IS PLATYPUS FROM AMAZON)
AND THEN A CONTRASTING STRIPE OF WASHI.  PERFECT MATCH TO MY RASKOG CART!
SEE PRIOR POST HERE


Share to Facebook Email This Share to Twitter Pin This

PAPER SCRAP STORAGE DE-MYSTIFIED

Friday, September 27, 2013

Searching the universe for paper scrap storage ideas? I was. My scrap storage was a total disaster; actually it was tidy but useless. Paper scraps were in Cropper Hopper envelopes that were too deep and unwieldy and hard to use. I also had a drawer and a bunch of other piles of scraps lying around because I hate to file.  Worse still I also never bothered to look through my scraps because "outta sight......"
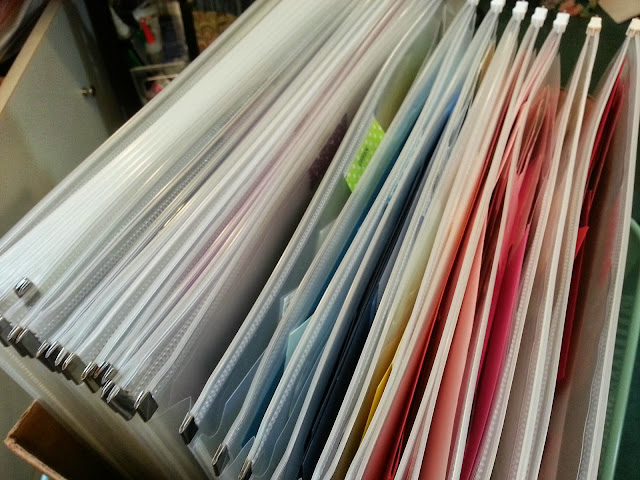
But I love my Raskog cart from Ikea and I thought that the top of it would be a great place to put a scrap filing system.  On the top of the cart I placed a cardboard box that measures 8.25” x 14.25” x 7.5” tall.  I already had about three of these ITOYA PolyZip envelopes, PZ-20CR  but I ended up buying about 17 more from the Office Dealer.  For only $1.69 they weren't a big investment and they are great for all kinds of storage.  In addition to the envelope space which zips closed, there is a front pocket.  I store my solid papers in the large envelope and in the front pocket I store all the patterned paper.  I have lately been putting some patterned scraps back in their pads to keep them together but these are all old scraps.  It is very, very convenient.  I just pick the envelope I want and can take it right to my work table.  On the little front tab I put a coordinating piece of Washi tape and P-touched a small label.  Now I just need to decorate the hideous box.  Any ideas?


My catagories are: ROYGBIV, pink, kraft, grey, Halloween, Christmas, Metallics and shimmers and I will probably have a separate one for 7 x 7" papers cut for albums but didn't get used. 


 Also great as project storage.


SCRAP STORAGE
Add caption
SCRAP STORAGE
Can you see the section in front of the zippered pocket?
Share to Facebook Email This Share to Twitter Pin This

HYBRID HALLOWEEN CARD

Tuesday, September 17, 2013

I’ve been wanting to try my hand at Distress Ink Background and a Halloween card for my grandson seemed like the perfect way to do that and to use some of my new Lawn Fawn stamps.  I also wanted a background scene image so I used Make it Crafty’s Eerie Scene digi image but fussy cut it and layered onto the background.
The moon was the hardest image to create from a blank circle.  I downloaded a photo from the internet and then just tried to copy it with copics.  It was so so but I then added Wink of Stella white and clear and that really perked it up although it was hard to photo (you can't see how it shines and the white looks globby).
I love the way the colors pop on the card but I don’t like my afterthought of the added silver stamped stars.  I think they are too big for the scene. The distress ink background was fun to create and I think I will be using this technique a lot.  The colors are amazingly vibrant.  All the images were colored with copics.

Make it Crafty eerie scene,  Lawn Fawn critters in costume


I hate fussy cutting but i wanted the stamped images to look like the digi images so didn't want the extra white border. 


lawn fawn trick or treat papertrey ink been boo'd
You can't see the Wink of Stella glitter on the wings  in the photo but it looks great in person

SUPPLIES USED:
DISTRESS INKS: SALTY OCEAN, MOWED LAWN, CHIPPED SAPPHIRE, PEACOCK FEATHERS.  INSIDE OF CARD- FESTIVE BERRIES, RIPE PERSIMMON, SPICED MARMALADE, MUSTARD SEED AND SQUEEZED LEMONADE.
STAMPS:
LAWN FAWN: CRITTERS IN COSTUME, HOPPY HALLOWEEN, TRICK OR TREET
PAPERTREY INK: BEEN BOO’D
MEMORY BOX GROVE BRANCH DIE
WINK OF STELLA WHITE AND CLEAR
MAKE IT CRAFTY DIGITAL IMAGE: EERIE SCENE
Share to Facebook Email This Share to Twitter Pin This

RANDOM THOUGHTS ON BLOGGING

Wednesday, August 21, 2013

I just read a great blog by  Victoria Elizabeth Barnes .  She writes whatI want to write (but she writes about remodeling) in the way that I want to write it but somehow don't.   Maybe that's because I mostly write in my head, like random thoughts composing themselves into an almost perfect blog post with no spelling or grammatical errors.  But, then I make breakfast and I can't remember ANYTHING.  I want everyone to read my blog, I am desperate for you to read my blog but I forget to write my blog.  You do see that this is a problem.  So, the eggs are congealing in a bowl, my husband is unfed but, drum roll, I am writing this down by hand, with a pen, not too legible but legible enough that I was able to transcribe it.  Should I get a voice recorder app for my phone?  I hate the way I sound on recordings but I have to find someway of getting what is in my head onto my blog. When I sit down to write, no thoughts come.  As I am drifting off to sleep, I write great stuff, remembering none of it in the morning.  Have you had this problem?  Have you solved it?  Please write, send postcards, texts, I need HELP!  I even have a sizable stash of cards that need posting that are rotting in the computer (can cards go bad or will they just fade away?).  
Share to Facebook Email This Share to Twitter Pin This