Pages

Showing posts with label Organization. Show all posts

COPIC ORGANIZATION- GRRR and AHA!

Tuesday, June 16, 2015

I have had a major problem with copic storage.  I love to look at them all lined up neatly in my craft room but I like to sit with my husband in the evenings and color while I am bored  am watching tv.  Here is what I first used.  I know a lot of people have created their own storage using these plastic grids from Home Depot but I found that my pens didn't pull out easily and occasionally the cap caught and pulled off.  Made me crazy.


I then invested (on sale) a full set of Crafter's Companion Ultimate Pen Storage
                                                      Crafter's Companion The Ultimate Pens and Markers Storage (Perfect for Copic & ShinHan) - Blue 
which worked GREAT!  Except......Not portable.  When I took the Copic Certification classes a few years ago, Copic was just coming out with their large totes and we each got one for taking the class. Woohoo!  I really found the little bag thingies that came with the tote irritating, the pens would fall over and I spent too much time searching for colors.  A few nights ago just before falling asleep, I started to wonder about putting separate cardboard boxes in the tote.  The small postal boxes fit perfectly!  I used 8 1/2 boxes.  I cut them to 4" tall and used the leftovers to create dividers.  This gives me the perfect solution, organized AND portable!  Now I can color like a fiend for Kathy's 30Day Color Challenge! The Daily Marker

copicstorage, copic tote

Share to Facebook Email This Share to Twitter Pin This

WHOLE HOUSE PURGE

Monday, April 20, 2015

I have been absent for a while due to a number of factors. The first being I have been sick with Epstein Barr, a sinus infection/cold and just can't seem to get rid of either one.  When I have an episode of EBV I have no ability to create.  It is stifles my creative mojo.  So instead I try to catch up on other projects.  My project/goal for this year is to do a whole house purge.  I read "The Life-Changing Magic of Tidying Up: The Japanese Art of Decluttering and Organizing" and was very inspired.  I started in our master bedroom closet and that took almost a week but it is done.  I then tackled the guest bedroom closet and that was major as it has stuff that belongs to the kids (all adults and long gone from the house), our stuff, storage stuff.  You get the idea.  That took 5 days and I just finished. So far,I have made 4 trips with the car full of stuff to donate.  I found a HUGE, I mean HUGE stash of needlepoint yarn which I need to sell on ebay and have just started listing.  If you need any, I probably have it!  So my creative space is a mess as you can imagine and I can't start any projects till I get some of this stuff OUT OF HERE!  Hope to be back soon with cards and coloring. 

Share to Facebook Email This Share to Twitter Pin This

CHRISTMAS CARD CHAOS

Wednesday, December 10, 2014

It is such a crazy busy time and I have made almost all my Christmas cards but have had no times to post a SINGLE one.  Soon, I promise.  However, here is a peek at my totally chaotic work area.
A better picture of the disaster.  Stamps and Dies on left are ALL holiday!
Copics in yogurt container are the ones I have been using and still need.
Share to Facebook Email This Share to Twitter Pin This

SCRAP PAPER STORAGE BOX FINISHED

Tuesday, October 1, 2013


EASY FIX.  COVER IN PATTERNED DUCT TAPE (THIS ONE IS PLATYPUS FROM AMAZON)
AND THEN A CONTRASTING STRIPE OF WASHI.  PERFECT MATCH TO MY RASKOG CART!
SEE PRIOR POST HERE


Share to Facebook Email This Share to Twitter Pin This

PAPER SCRAP STORAGE DE-MYSTIFIED

Friday, September 27, 2013

Searching the universe for paper scrap storage ideas? I was. My scrap storage was a total disaster; actually it was tidy but useless. Paper scraps were in Cropper Hopper envelopes that were too deep and unwieldy and hard to use. I also had a drawer and a bunch of other piles of scraps lying around because I hate to file.  Worse still I also never bothered to look through my scraps because "outta sight......"
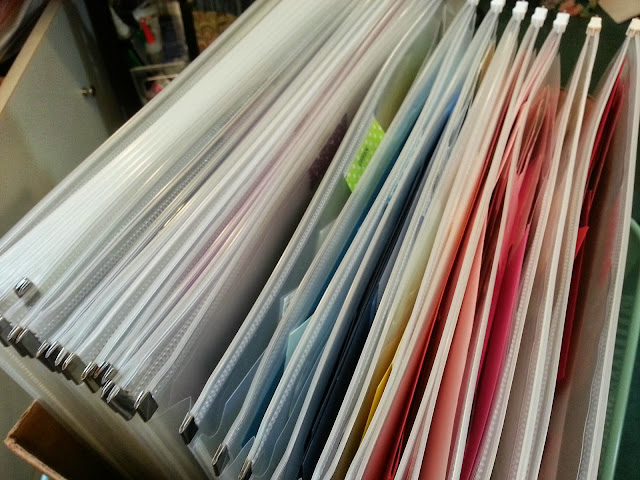
But I love my Raskog cart from Ikea and I thought that the top of it would be a great place to put a scrap filing system.  On the top of the cart I placed a cardboard box that measures 8.25” x 14.25” x 7.5” tall.  I already had about three of these ITOYA PolyZip envelopes, PZ-20CR  but I ended up buying about 17 more from the Office Dealer.  For only $1.69 they weren't a big investment and they are great for all kinds of storage.  In addition to the envelope space which zips closed, there is a front pocket.  I store my solid papers in the large envelope and in the front pocket I store all the patterned paper.  I have lately been putting some patterned scraps back in their pads to keep them together but these are all old scraps.  It is very, very convenient.  I just pick the envelope I want and can take it right to my work table.  On the little front tab I put a coordinating piece of Washi tape and P-touched a small label.  Now I just need to decorate the hideous box.  Any ideas?


My catagories are: ROYGBIV, pink, kraft, grey, Halloween, Christmas, Metallics and shimmers and I will probably have a separate one for 7 x 7" papers cut for albums but didn't get used. 


 Also great as project storage.


SCRAP STORAGE
Add caption
SCRAP STORAGE
Can you see the section in front of the zippered pocket?
Share to Facebook Email This Share to Twitter Pin This

IPAD APP FOR CRAFTING INVENTORY

Sunday, December 30, 2012

Do you forget what you own and end up with duplicates? I sure do and it really annoys me a lot to spend money on something I already own. For the last few months I have been using an app on my ipad called N+OTES and I love it. It is extremely simple to use and additional features are available to purchase. I will take you through it using screen shots.

The first screen shot is the main menu that shows upon opening the app. You add whatever categories you want on the left side and they are alphabetized.

The next view shows a highlighted list with the sub-list on the right.

The third shows the next level which is the actual inventory, the first page is dies and the second the stamps.

Me likely!! I also like that I can cut, paste and edit,which I had to do with my Copic refills since I am not at home to actually look at what I have. I went to my account on Oozak.com and cut and pasted my refill orders right into the inventory. Of course, I had to edit somewhat but it took mere seconds.

The other useful thing is to keep track of items used as I make cards or layouts that I want to post in my blog. I was using a notebook but I sometimes forget to take it with me.

If you want an easy way to keep track of all the "stuff" that you have I highly recommend this app.

https://itunes.apple.com/us/app/n+otes/id480085812?mt=8


Share to Facebook Email This Share to Twitter Pin This

CRAFT ROOM CHAOS

Thursday, December 13, 2012

What a mess my craft room is in.  About a month ago I decided I needed to rearrange, redo and add
some vertical space over my work area.  So, I pulled everything off and put it on the floor and on every available horizontal space.  Well since everything was down I thought I might as well paint.  So now I am living in a disaster zone.  We were in NYC and Washington DC for a week, then I had to go to work and was jet lagged and what with all the typical business upon returning (4 loads of laundry to do) I HAVEN'T GOTTEN ANYTHING DONE.  Please a little sympathy would be appropriate here.  Also, I got a HUGE haul of stuff from Papertrey Ink, Simon Says Stamps, MFT and the list goes on and all that needs to be filed away.  What I have been able to do is to P-touch all my ink pads and order a couple of reinkers.  That is pretty organized now but I think I have another order of ink pads coming??? Help, it is a disease.  Anyway I thought I'd share some chaos photos and hopefully after the new year I will be finished.
Oops, forgot, we will be in Mammoth for 2 1/2 weeks so can't get anything done then (but I will bring up
lots of projects to work on.  Hope this chaos doesn't go on too long cause I can't get any FUN stuff done.


SOME OF THE HAUL

INK PADS I USE MOST OFTEN, NOW LABELED

THIS IS THE WALL THAT NEEDS THE VERTICAL STORAGE

THESE TWO PHOTOS SHOW EVERYTHING EVERYWHERE AND
ALSO A RUBBER MAID THAT I PACK FOR MAMMOTH
                                       

THIS IS JUST EMBARRASSING!

Share to Facebook Email This Share to Twitter Pin This

CLEANING OUT SUPPLIES WEEKEND

Sunday, August 19, 2012

I always wait for a weekend when my hubby is away so I can make a total mess and clean up.
So, that's what I did on this extremely hot weekend.  Got the dog out early, did some chores and then it was time to get down to business.  One of the things I cleaned out was almost a years worth of kits from Club Scrap from when I first started scrapping and I realized, I NEVER scrap or make cards from kits.  It is a wonderful resource if you can work with prepared kits but I can't.
So, I took all those kits, which I had nicely stored in plastic envelopes, and separated them out into their components.  Printed paper, card stock, vellum etc.  Some of the printed card stock was so dated.  Who would of thought that craft supplies would look as dated as old clothes!
Well they do, but the backsides are perfectly plain and usable.   Anything I felt I couldn't use I put in a box to give away.   Same thing with stickers.  I used to use a gazillion of them (remember Creative Memories?) in my scrapbooks, and  looking back on those early albums, they look good but its not how I am scrapping now.  Thanks to the Cameo I don't have to constantly buy stickers so those also got stashed in a more effective way, file folders by category, and a whole lot got put into the give away box.   I actually ended up with three empty paper cubbies and some extra room on one storage shelf, and I only used supplies I had on hand.  
The only thing I did purchase were these really neat Post It clear plastic envelopes which are perfect for storing left over die cuts.  I have them in an old wood box at the moment and can store them right on the shelf with my Big Shot. 
All in all, a very productive weekend (it feels even better than cleaning out my closet) and I have refreshed my memory of what supplies I have on hand.

Sticker storage
Newly organized sticker storage.
                                     
                                               
Wow, three empty paper shelves. Hmm...


Craft storage for die cuts
Excellent storage option for a variety of things

Craft die cut storage
very compact storage for left over die cuts


   -------------------------supplies-----------------------

Martha Stewart Home Office Avery Labels


Share to Facebook Email This Share to Twitter Pin This

DIE STORAGE- FINALLY!

Monday, July 16, 2012


I need help.  I am obsessed with storage.  But then again, as paper crafters aren’t we all?  How much time do you spend on the internet searching out the “PERFECT STORAGE” idea?  And I love that feeling when I find something that gives me an Aha! moment, will it work, can I tweak it just a bit, is this really it? Sound familiar?  It is definitely me.  Aside from buying new goodies, I spend more time trying to figure out how to store them than using them.  My longest ongoing search and discover is for die storage.  Can’t store them by color and they are all different shapes, yikes, how do you deal with them?  Well, check the internet, watch “YouTube”, there are a gazillion solutions out there and I have tried a number of them.  First I tried the binder with the soft plastic zip up inserts.  Hated those, they got stuck on the binder rings and it was difficult to flip through them and space per die ratio wasn’t good.  $25.00.   Then I bought 3 of those plastic boxes that are made for cling stamps and put the Avery magnetic sheets on those.  Nope, didn’t like that either, again, hard to access and the space per die ratio was not working for me.  $36.00.  I next saw a blog where a CD storage box (Atlantis)with hanging folders was used.  Wow, that had to be a great solution.  I have four  $40.00.  You can see where this is going.  The boxes actually worked for a while but the larger dies didn’t fit and I couldn’t actually see the dies until I pulled the individual folder out.  I need to see those dies.  So through all this experimentation I discovered that
                     I need to see my dies quickly and don’t want a reference sheet as to where they are filed.
                      I want a solution where I can store some dies together if they are small or of a type.
                      I need them filed by company
                      I need to be able to add new dies quickly and efficiently.
Okay, expensive learning process.  But, it is important to recognize how you function in your craft space. My big shot sits on an old stainless steel medical 3 shelf cart that my husband gave me and I have room next to it to store dies and room on the shelves below.  About a month ago I was reading one of the many blogs I follow (will try to find it) and whoever it was stored her dies in a library drawer on what looked like file cards.  Wow, I loved it and I immediately started searching for library drawers.  Too expensive, too small, not what I wanted.  So the idea percolated for a while and I realized that I had a spare large banker’s box – you know those ugly green things that you can keep checks in- and a half pack of 5 x 8 sturdy three tabbed file dividers.  WooHoo!  I cut down the box, cut and glued Avery magnetic sheets to the dividers, covered each tab (by manufacturer) in washi tape and Voila, happy at last.  Well, not completely, I had to order more dividers.  


A little post note:  the spellbinders grand calibur also fit but not on the cards.  I used a piece of cardboard cut to fit and it is sitting in the very back of the file box.  

Supplies:


Washi tape from stash


Share to Facebook Email This Share to Twitter Pin This

My Copic Storage

Saturday, April 28, 2012

My Copic Storage

Here is my wonderful Copic storage box (my idea and my husbands handywork).  We started with a wine crate that we knew would fit on my bookshelf and I bought the light louver from Home Depot.  


Empy crate with trimmed louvers


Louver gorilla glued to wood strip


Back louver glued into place


Front louver glued in and then screwed in for stability-
they WILL NOT move, no matter what I do


And here is the finished product! It holds all my pens (354 ish) with lots of room
to grow.  Isn't it beautiful!


Now my coloring corner is complete.


Share to Facebook Email This Share to Twitter Pin This