My Niece had her baby in June and here it is almost the end of August and I have just now finished the card and the present. When I started the card in June I wanted to see if I could get the image into the Cameo so I wouldn't have to cut it by hand. I was able to do that but it was a process( for a later blog). I had also ordered some adorable onesies from Fab.com but they still haven't arrived! So card not made, presents not sent.
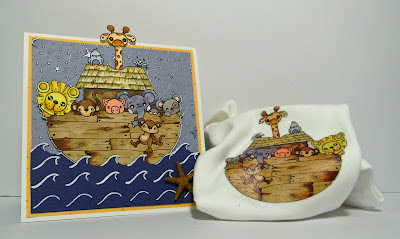
Suzie McKenzie had taken the digital image and colored it in PS and then printed it onto iron on transfer paper. Wow, make digi images into iron on images, what a great idea! My problem was that I had already colored the image with Copics and had no idea how to use Photoshop elements to color like Suzi did. So, I took a photo, edited it in PSE and then printed it onto the transfer paper. I used the erase tool to get rid of the background and did some color correction. Then I printed and went to iron it on. Lets just say the second one came out perfectly. They don't tell you to CUT AROUND the image....
Well it is finally done and I am so happy with how it came out. Thank you Suzi for your great idea!
 |
| I will use this idea again as it really isn't too difficult and it is such a personal gift. |
 |
I changed the roof to thatch and used Copics and Copic
Multiliners. There are so many colors in the roof
but it is hard to tell from my photo.
I double backed the giraffe head so he wouldn't get damaged. |
 |
The papers are all from my stash as is the button.
The natural twine in the button is May Arts. |
-------------Supplies--------------


