Pages

Showing posts with label Copic Markers. Show all posts

30 D AY COLORING CHALLENGE DAY 3: WHEN THINGS GO WRONG...

Friday, March 3, 2017

I just love this stamp from Mama Elephant and was excited to finally have a chance to color it.  I stamped it on bristol board to use with the zig clean color brushes and also on Hammermill 100lb digital cover sheet (Amazon) for coloring with Copics.

The first photo is of the image stamped on the bristol and started with the zigs.  To get the ombre effect on the letters I applied the paint to the bottom of the letters and then pulled the color up with a water brush. Pretty much the same technique for the flowers and leaves, although the leaves have 2-3 colors.  I used wink of stella on the Hello.
 When I finished all the coloring I thought the images might look really vibrant against a black background and I really, really didn't want to fussy cut it.  So I took a black marker and colored all around the image but the strokes were visible and it wasn't a really dense black so I covered it with the Spectrum Noir Sparkle Black pen, which you can see below.  Hmmm

 It seems like a hot mess to me and I wish I had just cut it out.  On the picture below, you can see the image stamped on the Hammermill paper with Wplus9's Fairy Dust Ink pad for some no line Copic Coloring.  Hoping to finish that in a few days.

Share to Facebook Email This Share to Twitter Pin This

30 DAY COLORING CHALLENGE DAY 2

Thursday, March 2, 2017

Day 2 - This is is one if the images I stamped in preparation for the challenge and it is embossed in gold.  I used Copics to color with a little bit of color pencil.  For the background I mixed a few drops of BV29 with about 15 drops of 0 blender solution into a tiny bottle and painted it on with a waterbrush filled with blender solution.  I didn't add any texture but left it very soft.  I went back over areas that I wanted darker.  As usual, I can't remember which stamp company this is from but will add it as soon as I find it (I am so disorganized at the moment).
this photo is a little washed out compared to original

Share to Facebook Email This Share to Twitter Pin This

POWER POPPY CHRISTMAS WREATH

Friday, December 2, 2016

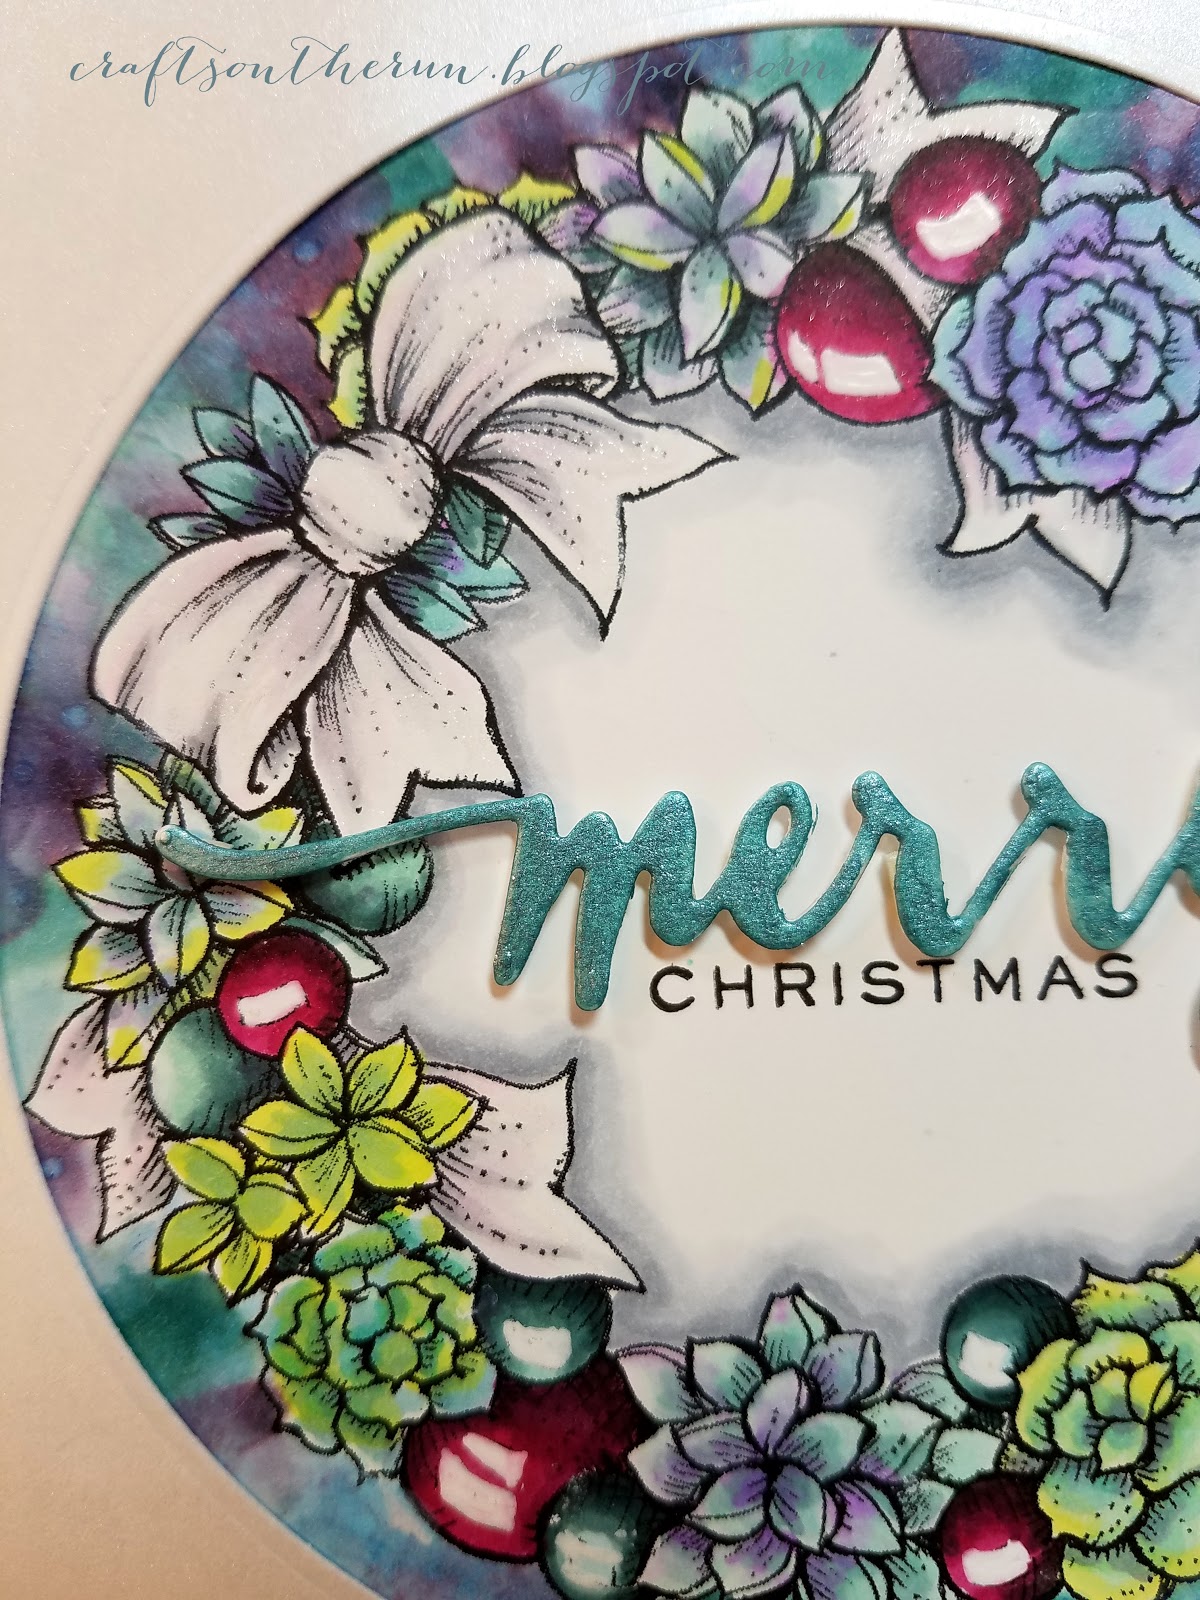
I so love this Power Poppy image but it took me quite a while to actually finish the coloring and because I sized it so large (4 1/2 inches) I wasn't sure what I was going to do to make the card.  I die cut it in a circle thinking I would make a frame but I didn't like that so instead I used a circle die to just overlay it.  I kept the sentiment simple, a Wplus9 Merry die (colored with Spectrum Noir Shimmer Pen and also used clear on the red ornaments)and the Christmas word from their Festive Greetings. The white shimmer paper is from PTI which kept it simple but pretty.  I really wanted the image to be the primary focus.  Hope you all like it and I would love to hear from you!


Power Poppy, Christmas Wreath, Christmas Cards


Share to Facebook Email This Share to Twitter Pin This

TRI-FOLD ELF CHRISTMAS CARD

Saturday, November 26, 2016

I love these MFT Santa's elves and finally got a chance to color them and to do them in a mix of pastel colors. I don't know why I opted for a tri-fold as I could have gotten three cards instead but I just liked the idea.  The sentiments are Mama Elephant Merry Christmas Wishes and Simon Says Stamps Hand Lettered Winter Wishes.  Dies used: MFT Stitched Snow Drifts and Simon Snowflakes.  The shimmer paper is PTI, the sequins are Lucy's, embossing powder is Hero Arts Satin Pearl (love, love, love) and the whole card was spritzed with shimmer mist.  

christmas cards, simon says stamps, mft Santa's elves, copic markers
FRONT

RIGHT

MIDDLE

Share to Facebook Email This Share to Twitter Pin This

POST BOOT CAMP ORGANIZATION and UPCYCLED CARD FILE DRAWERS

Tuesday, November 22, 2016

I had an amazing weekend at Jennifer Dove's Copic Boot Camp (check out her blog, amazeballs!).  And we got to color those amazing boots! Meeting all those creative women was an added pleasure and I hope to do it again.


However, when I got home my craft room was in a major state of disarray.  So while trying to clean up and reorganize my husband unearthed 4 card boxes from his old medical office and I thought hmmm I can use those!.  He cleaned and painted them and they turned out to be great storage.  Love upcycling!

 all my distress paints fit into one drawer

This drawer holds all my alcohol inks

These turned out to be a great garage find and the hubs was happy to have them used even though he had to paint them.


Share to Facebook Email This Share to Twitter Pin This

HONEY BEE STAMPS FLORAL CARD

Thursday, August 25, 2016

Having a very busy summer here in Southern CA.  We had to drive down to San Ysidro (right on the Mexican border) last weekend to get our Global Entry passes, working more than usual and in general, just busy! I have been working on this card over the last few days, coloring at night while watching TV and then slowly assembling.  I stamped and colored with copics some of the flowers from the Honey Bee Stamps Country Blooms, and colored the background with copics and applied texture using a bit of towel and blender solution. I used a craft knife to cut an irregular window and tried to cut a similar window out of the teal card stock (somewhat unsuccessfully).  I applied two additional fussy cut flowers to overlap the cutout and stamped my sentiment on the inside of the card.  The card looked fine but I decided to throw on some sequins on three sides of the card.  If you like it let me know as comments let me know that there is someone out there.


Share to Facebook Email This Share to Twitter Pin This

RAINBOW CARD CHALLENGE - WINNIE & WALTER SO TWEET CARD AND ONESIE

Saturday, June 11, 2016

UPDATE:  Since this post is now a part of Sandy Allnock's Rainbow challenge, I thought I would update you all with this info and a link to the other bloghop members.  See the end of the post for the link to the other blogs.


I love this Winnie & Walter stamp and since two of my co-workers are pregnant I knew it would get immediate use. I stamped in Simon Intense Black Ink on Neenah Solar white 110 lbs. using my MISTI to help with the masking.  That was a challenge, deciding on the birds position and then stamping and masking accordingly.  Thanks again MISTI !  I colored with copic markers which have been ignored lately in favor of watercolors and used the sentiment from the stamp set.  I mounted the panel on MFT stone gray cardstock

One of my favorite way to make a gift totally unique and special is to make a matching onesie using transfer paper (Avery).  I love the all cotton onesies that I get on Amazon and I copy and print the card on that in order to iron onto the onesie.  Really fun!  I hope you like this card and onesie and give it a try yourself.  


winnie & walter, rainbow, baby card, copic markers


The little onsie looks very dark here and that is something you need to watch out for but it actually isn't as dark as it appears.  


Winnie & Walter stamps, Baby Card, Copic Markers


BLOGHOP


Share to Facebook Email This Share to Twitter Pin This

TIME FLIES.....

Thursday, May 12, 2016

I cannot believe it is already mid May and I have been so crazy busy that I haven't had a chance to post since February.  I was travelling in April to Virginia and New York to visit lots and lots of family.  In Virginia I had the pleasure of meeting and having lunch with the wonderful Suzanne Dean. You can still follow her on Pinterest and see all of her wonderful copic coloring tutorials.  So my calendar looked like this from April 30 to May 13; anniversary, birthday, birthday, mother's day, birthday.  Yikes!   Here, finally, is the card I made for my Grandson whose birthday is the day after mine.


birthday cards, Paper Smooches

I have been wanting to try tone on tone die cutting which I did with all the numbers but I inset die cut the large number 10 and used a balloon die cut for the zero. The cute little bird is from Paper Smooches.


Share to Facebook Email This Share to Twitter Pin This

MAKE IT CRAFTY: AURORA BOREALIS CHALLENGE

Wednesday, December 9, 2015

Make it Crafty, copic markers

I haven't done a challenge in quite a while but trying to color, paint, create an aurora borealis intrigued me.  I first colored the background with distress inks and splatted the stars.  I used a dry brush and guache paints to create the aurora.  After it was dry I used wink of stella clear to give it a real shimmer effect.  You can sort of see it below.
The cute little snowman is Make It Crafty colored in copics and popped up with foam tape.  This really was a challenge for me but I did enjoy it.


Share to Facebook Email This Share to Twitter Pin This

ONLINE CARD CLASSES: HOLIDAY STYLE MASKING

Sunday, November 15, 2015


Onlinecardclasses, Wplus9, copic markers, Christmas Cards


You can see the stickles here but not the subtle glitter in the snowflakes


Day 5 was cutie patooties and I opted to try out a one layer card with masking. Laura Bassen's card was just to adorable to resist and I wanted to get all the layers correct. I started by stamping the small gift and then worked my way backward, masking each layer. When all the stamping and masking was done, I blended my sky with Amuse Pigment inks.  I just love using pigment inks for blending.  When the ink was dry (the next day cause it was very late at night and bed was calling) I used Carte Bella snowflake stencil with Aleene's glitter snow embossing paste.  When that was completely dry, I pulled off all the masking paper and colored the images with Copics.  The ribbons and bows are painted in gold but they don't show up well in the photo. I used StarDust stickles all over for an added glittery snow effect.  After I finished the card I realized I totally forgot a sentiment and also the card was warped so I cut it down and adhered it to a green card base which solved the warping problem and I typed and foiled a greeting and adhered that to the top.  Hope you like it.


 WPLUS9 Holiday Hugs
PTI Double ended banners

Share to Facebook Email This Share to Twitter Pin This

SPARKLY ORNAMENT CHRISTMAS CARD

Tuesday, November 10, 2015

Christmas Card


One of the things I love about taking OCC's Holiday Style class is that it revs me up and gets me into high creative gear.  I colored this image  over the summer and never did anything with it but I pulled it out to finish. Got to get those Holiday cards made!
One of the problems I had was combining colored pencils on the kraft paper with wanting to use my copics for the scene to make it bright and stand out.  I used my Faber Castell Polychromos and a silver metallic pencil on the ornament and restamped on X-Press It paper then colored just the center with  Copics, cut it out and adhered. 


I used Wink of Stella Clear over the pencils to add some shimmer, which you can see in the photo below.  I cut the die out of the matching red card stock and embossed it with Filagree detail gold.  I also masked the ornament and spritzed with white and silver misters.


Lastly, I adhered the image to Tim Holtz Glitter Sheet with dimensional adhesive.  Woohoo another card done!


CREATIVE EXPRESSIONS ORNAMENT CLING STAMP
SIMON SAYS CIRCLE SAYINGS HOLIDAY
WPLUS9 MERRY WORD DIE
HERO ARTS UNICORN MISTER
TIM HOLTZ DISTRESS SPRAY BRUSHED PEWTER

Share to Facebook Email This Share to Twitter Pin This

MO MANNING HOBSON HALLOWEEN CARD

Thursday, October 8, 2015

I fell in love with Hobson as soon as I saw him and purchased both versions.  He is as cute as can be and so much fun to color.  For the Happy Halloween, I printed the text on black card stock on my laser printer and then foiled in green.  I also printed up extra pumpkins and fussy cut everything to layer.  The background is blended distress inks and then cut with Lawn Fawn Snowy backdrop die and layered over MFT sour apple card stock.


Mo Manning Hobson, Halloween, Copic Markers


COPIC SKETCH MARKERS USED:

BV 23,25,28  N5, N3
YR4, YR15, YR27, YR68, E08
YG01,YG03, YG17, YG23, 


Share to Facebook Email This Share to Twitter Pin This

JENNIFER DOVE (just4funcrafts) SUNFLOWER STAMP BIRTHDAY CARD

Sunday, June 28, 2015

Ooh, I had so much fun coloring this stamp.  It is my step-daughter's big 50 birthday so I made this for her.  Colored with copics of course!


birthday card, copic markers, jennifer dove, sunflower, cc designs

Share to Facebook Email This Share to Twitter Pin This

SIMON SAYS STAMPS FARM ANIMAL BIRTHDAY CARDS

Friday, June 26, 2015

I love coloring these little animals for cute and quick birthday cards.  


simon says stamps farm animals, birthday card, copic markers

simon says stamps farm animals, copic markers, birthday cards


SIMON SAYS STAMPS FARM ANIMALS
CLEAR AND SIMPLE GRASS STAMP
LAWN FAWN CARD
SIMON SAYS TILTED BANNER DIE AND SENTIMENTS
SIMON SAYS STICHED SLOPES AND HILLS
Share to Facebook Email This Share to Twitter Pin This

30 DAY COLORING CHALLENGE

Tuesday, June 16, 2015

YES! In the midst of having painting done in the house I finally had a chance to post some of the coloring I've been doing.  No cards made yet (typical) but lots of coloring.  Here is Gnomes from MFT, obsessed with these adorable little guys.  

MFT stamps GNOMES
Share to Facebook Email This Share to Twitter Pin This

COPIC ORGANIZATION- GRRR and AHA!

I have had a major problem with copic storage.  I love to look at them all lined up neatly in my craft room but I like to sit with my husband in the evenings and color while I am bored  am watching tv.  Here is what I first used.  I know a lot of people have created their own storage using these plastic grids from Home Depot but I found that my pens didn't pull out easily and occasionally the cap caught and pulled off.  Made me crazy.


I then invested (on sale) a full set of Crafter's Companion Ultimate Pen Storage
                                                      Crafter's Companion The Ultimate Pens and Markers Storage (Perfect for Copic & ShinHan) - Blue 
which worked GREAT!  Except......Not portable.  When I took the Copic Certification classes a few years ago, Copic was just coming out with their large totes and we each got one for taking the class. Woohoo!  I really found the little bag thingies that came with the tote irritating, the pens would fall over and I spent too much time searching for colors.  A few nights ago just before falling asleep, I started to wonder about putting separate cardboard boxes in the tote.  The small postal boxes fit perfectly!  I used 8 1/2 boxes.  I cut them to 4" tall and used the leftovers to create dividers.  This gives me the perfect solution, organized AND portable!  Now I can color like a fiend for Kathy's 30Day Color Challenge! The Daily Marker

copicstorage, copic tote

Share to Facebook Email This Share to Twitter Pin This

MAKE IT CRAFTY SPOTLIGHT COLORING CHALLENGE

Wednesday, March 11, 2015

An almost spectacular fail.  Wow, this was really a hard challenge.  Didn't quite get the elipse shape of the spotlight and my beam wasn't quite lined up.  Will have to try this again.
Also, how do you get the shadow shapes correct???  I also noticed that as soon as I upload I see things that I don't when I am looking at the original.  I should have put another white highlight on the right extended foot.  More practice needed but I am committed to posting my learning processes and not just what I am happy with.


Make it Crafty

Share to Facebook Email This Share to Twitter Pin This

30 DAY COLORING CHALLENGE #atthedailymarker30day

Tuesday, March 10, 2015

I flew home from NY on Saturday so obviously didn't get any coloring done and then I was jet lagged and just plain exhausted.  Yesterday I was functional enough to finish coloring the Make it Crafty lilies that I started in NY and finished the card this am.  


MAKE IT CRAFTY LILIES DIGI
MAMA ELEPHANT FEMME FRAMES
PAPERTREY INK SHIMMER CS
AVERY ELLE 120LB WHITE CS
COPICS
CLEARLY BESOTTED ALL OCCASION SENTIMENT
RANGER LIQUID PLATINUM EMBOSSING POWDER
WINK OF STELLA CLEAR
Share to Facebook Email This Share to Twitter Pin This

30 DAY COLORING CHALLENGE #thedailymarker30day

Friday, March 6, 2015

Today is my last day in NY with my sister and I am quite sad to leave her but glad to get home to my hubby.  In the midst of getting her resettled and packing, I took  break and began to color this wonderful Make It Crafty digi.  Zoe, I just love all these flower stamps!  It is far from finished but I may get to work on it on my 5 hr. flight home tomorrow.  Here is my coloring for today.

Copics used so far: E000, 35, 77:  RV 10,11,13: YR24:  YG07,45,63,67


Share to Facebook Email This Share to Twitter Pin This

30 DAY COLORING CHALLENGE DAY 2: #thedailymarker30day

Thursday, March 5, 2015

Brrr, it is snowy and cold on Long Island today so staying in (the hotel room) is just fine.  One of the images I brought with me to color is this adorable Mo Manning digi printed on Xpress it paper.  I thought I had more skin and hair colors with me .. but nope, I don't so here is my attempt with my limited supplies on hand.  Left the little flowers uncolored so I can add some white and wink of stella when I get home.


By the way, I am completely inept at blogging on my ipad. Can't figure out how to size photoes and a bunch of other problems.

Share to Facebook Email This Share to Twitter Pin This