Pages

CLEANING OUT SUPPLIES WEEKEND

Sunday, August 19, 2012

I always wait for a weekend when my hubby is away so I can make a total mess and clean up.
So, that's what I did on this extremely hot weekend.  Got the dog out early, did some chores and then it was time to get down to business.  One of the things I cleaned out was almost a years worth of kits from Club Scrap from when I first started scrapping and I realized, I NEVER scrap or make cards from kits.  It is a wonderful resource if you can work with prepared kits but I can't.
So, I took all those kits, which I had nicely stored in plastic envelopes, and separated them out into their components.  Printed paper, card stock, vellum etc.  Some of the printed card stock was so dated.  Who would of thought that craft supplies would look as dated as old clothes!
Well they do, but the backsides are perfectly plain and usable.   Anything I felt I couldn't use I put in a box to give away.   Same thing with stickers.  I used to use a gazillion of them (remember Creative Memories?) in my scrapbooks, and  looking back on those early albums, they look good but its not how I am scrapping now.  Thanks to the Cameo I don't have to constantly buy stickers so those also got stashed in a more effective way, file folders by category, and a whole lot got put into the give away box.   I actually ended up with three empty paper cubbies and some extra room on one storage shelf, and I only used supplies I had on hand.  
The only thing I did purchase were these really neat Post It clear plastic envelopes which are perfect for storing left over die cuts.  I have them in an old wood box at the moment and can store them right on the shelf with my Big Shot. 
All in all, a very productive weekend (it feels even better than cleaning out my closet) and I have refreshed my memory of what supplies I have on hand.

Sticker storage
Newly organized sticker storage.
                                     
                                               
Wow, three empty paper shelves. Hmm...


Craft storage for die cuts
Excellent storage option for a variety of things

Craft die cut storage
very compact storage for left over die cuts


   -------------------------supplies-----------------------

Martha Stewart Home Office Avery Labels


Share to Facebook Email This Share to Twitter Pin This

Penny Black Double the Trouble Challenge

Friday, August 17, 2012


Well this is a first for me, my very first challenge and I hope you like it.  I
colored the image with Copics first (while I was vacationing in Mammoth)
 and then had to match the papers when I got home.  I was lucky in
having the Basic Grey Kissing Booth Paper which picked up the
colors nicely.


Penny Black Saturday Challenge

Penny Black Bubbly, Flowers Sweet and Words Express

Penny Black

I'm not much of a bow maker but I managed to
get it tied and attached!

Share to Facebook Email This Share to Twitter Pin This

Copic Coloring at Altitude, Mammoth Lakes CA

Saturday, August 11, 2012

We are up in the Eastern Sierras for a week enjoying the beautiful, cooler weather, hiking and biking.  Aside from our aged labrador having breathing problems it has been very relaxing.  When we come up here I usually bring all my copics and a lot of images to color, no paper, cardstock or card making stuff as it is just too much. The most important thing to remember when using your Copics at altitude is to remember to open them from BOTH ends at the same time the first time you use them.  That way the pressure equalizes and you don't get ink blobbing all over your paper.   Here are a couple of coloring projects that I have worked on and will make into cards when I get home.  
Justinlined poppy corner
Justinklined Poppy Corner


Here is a detail.  
Justinklined Poppy corner detail

Justinklined Gardener's Harvest
Justinklined Gardeners Harvest
I have left the wheelbarrow uncolored for now since I may want to 
co-ordinate with a paper.

The reds are better in the original but I am pretty happy with the way this
turned out.  It was hard to get the bluish tint to the 
large cabbage leaves.

And last but not least a pic of the boats at Lake George a few days ago. 
I was hoping to get a photo of the Momma Bear that comes around
to steal fish from the fishermen on an almost daily basis.  
I walked around the whole lake but no luck.


Share to Facebook Email This Share to Twitter Pin This

HAPPY HEXAGON BIRTHDAY CARD

Sunday, July 22, 2012

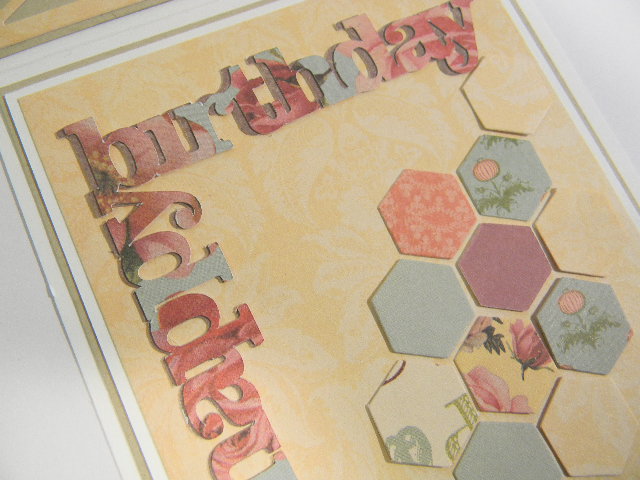
I started making cards last December and while I just love it, I am ALWAYS behind schedule and frantically trying to create late at night (not a good idea for me) or early in the morning before the day gets crazy.  However, I have actually managed to finish my daughter's birthday card EARLY.  This was a perfect opportunity to use Papertreyink's happy hexagon cover plate die.  I selected My Mind's Eye Evangeline paper and sprinkled it though out the card.
PTI's Double Ended Banner Die and a MME brad completed the front.
The colors aren't good in my photo but the brad matches the Kraft paper perfectly (doesn't look like it does it)
Papertrey Ink Happy Hexagon cover sheet
Inside:

The large hexagon was cut on the Cameo.

So glad this is done with plenty of time to spare.  Now I have to finish coloring the baby card I started weeks ago! sigh.
Share to Facebook Email This Share to Twitter Pin This

JUSTINKLINED BIRTHDAY CARD

Friday, July 20, 2012

This glam digital image from Justinklined.com was the inspiration for a card for my step-daughter.  I wanted something that reflected her love of shoes and fashion and I  also wanted to work a little outside my comfort zone of softer colors. I decided that the sole of the shoe had to reflect ultimate glamour so it just had to be RED and the high contrast palate of black, red, grey, silver and white just flowed from that.  I colored the image with copics and then made the card more three dimensional card by turning my middle layer. Of course I had to use some bling (the letters, rhinestoes and Atyou Spica on the shoe.  


Justinklined fashion shoe


Supply List:

Justinklined.com fashion shoe
Copics and Atyou Spica
Copic Xpress It paper
Spellbinders Lacy Circles die
Cheery Lynne Fanciful Flourish die
Memory Box Macarena Corner die 
Neenah solar white
Rhinestones are from Michael's
Patterned paper Making Memories Wedding 8x8 (stash)
Red paper from stash 
Bling letters from stash


Share to Facebook Email This Share to Twitter Pin This

DIE STORAGE- FINALLY!

Monday, July 16, 2012


I need help.  I am obsessed with storage.  But then again, as paper crafters aren’t we all?  How much time do you spend on the internet searching out the “PERFECT STORAGE” idea?  And I love that feeling when I find something that gives me an Aha! moment, will it work, can I tweak it just a bit, is this really it? Sound familiar?  It is definitely me.  Aside from buying new goodies, I spend more time trying to figure out how to store them than using them.  My longest ongoing search and discover is for die storage.  Can’t store them by color and they are all different shapes, yikes, how do you deal with them?  Well, check the internet, watch “YouTube”, there are a gazillion solutions out there and I have tried a number of them.  First I tried the binder with the soft plastic zip up inserts.  Hated those, they got stuck on the binder rings and it was difficult to flip through them and space per die ratio wasn’t good.  $25.00.   Then I bought 3 of those plastic boxes that are made for cling stamps and put the Avery magnetic sheets on those.  Nope, didn’t like that either, again, hard to access and the space per die ratio was not working for me.  $36.00.  I next saw a blog where a CD storage box (Atlantis)with hanging folders was used.  Wow, that had to be a great solution.  I have four  $40.00.  You can see where this is going.  The boxes actually worked for a while but the larger dies didn’t fit and I couldn’t actually see the dies until I pulled the individual folder out.  I need to see those dies.  So through all this experimentation I discovered that
                     I need to see my dies quickly and don’t want a reference sheet as to where they are filed.
                      I want a solution where I can store some dies together if they are small or of a type.
                      I need them filed by company
                      I need to be able to add new dies quickly and efficiently.
Okay, expensive learning process.  But, it is important to recognize how you function in your craft space. My big shot sits on an old stainless steel medical 3 shelf cart that my husband gave me and I have room next to it to store dies and room on the shelves below.  About a month ago I was reading one of the many blogs I follow (will try to find it) and whoever it was stored her dies in a library drawer on what looked like file cards.  Wow, I loved it and I immediately started searching for library drawers.  Too expensive, too small, not what I wanted.  So the idea percolated for a while and I realized that I had a spare large banker’s box – you know those ugly green things that you can keep checks in- and a half pack of 5 x 8 sturdy three tabbed file dividers.  WooHoo!  I cut down the box, cut and glued Avery magnetic sheets to the dividers, covered each tab (by manufacturer) in washi tape and Voila, happy at last.  Well, not completely, I had to order more dividers.  


A little post note:  the spellbinders grand calibur also fit but not on the cards.  I used a piece of cardboard cut to fit and it is sitting in the very back of the file box.  

Supplies:


Washi tape from stash


Share to Facebook Email This Share to Twitter Pin This

Color inspirations

Saturday, May 5, 2012

Walking in Alexandria VA and just loved some of the quaint but imaginative windows. Always looking for inspiration. Hope the pics show up from iPad.
Share to Facebook Email This Share to Twitter Pin This